{
  "id": 362931,
  "title": "17th place solution",
  "url": "/competitions/rsna-2022-cervical-spine-fracture-detection/discussion/362931",
  "author_name": "Ori Hanegby",
  "post_date": "2022-10-30T03:46:25.507000",
  "votes": 33,
  "comment_count": 3,
  "views": 0,
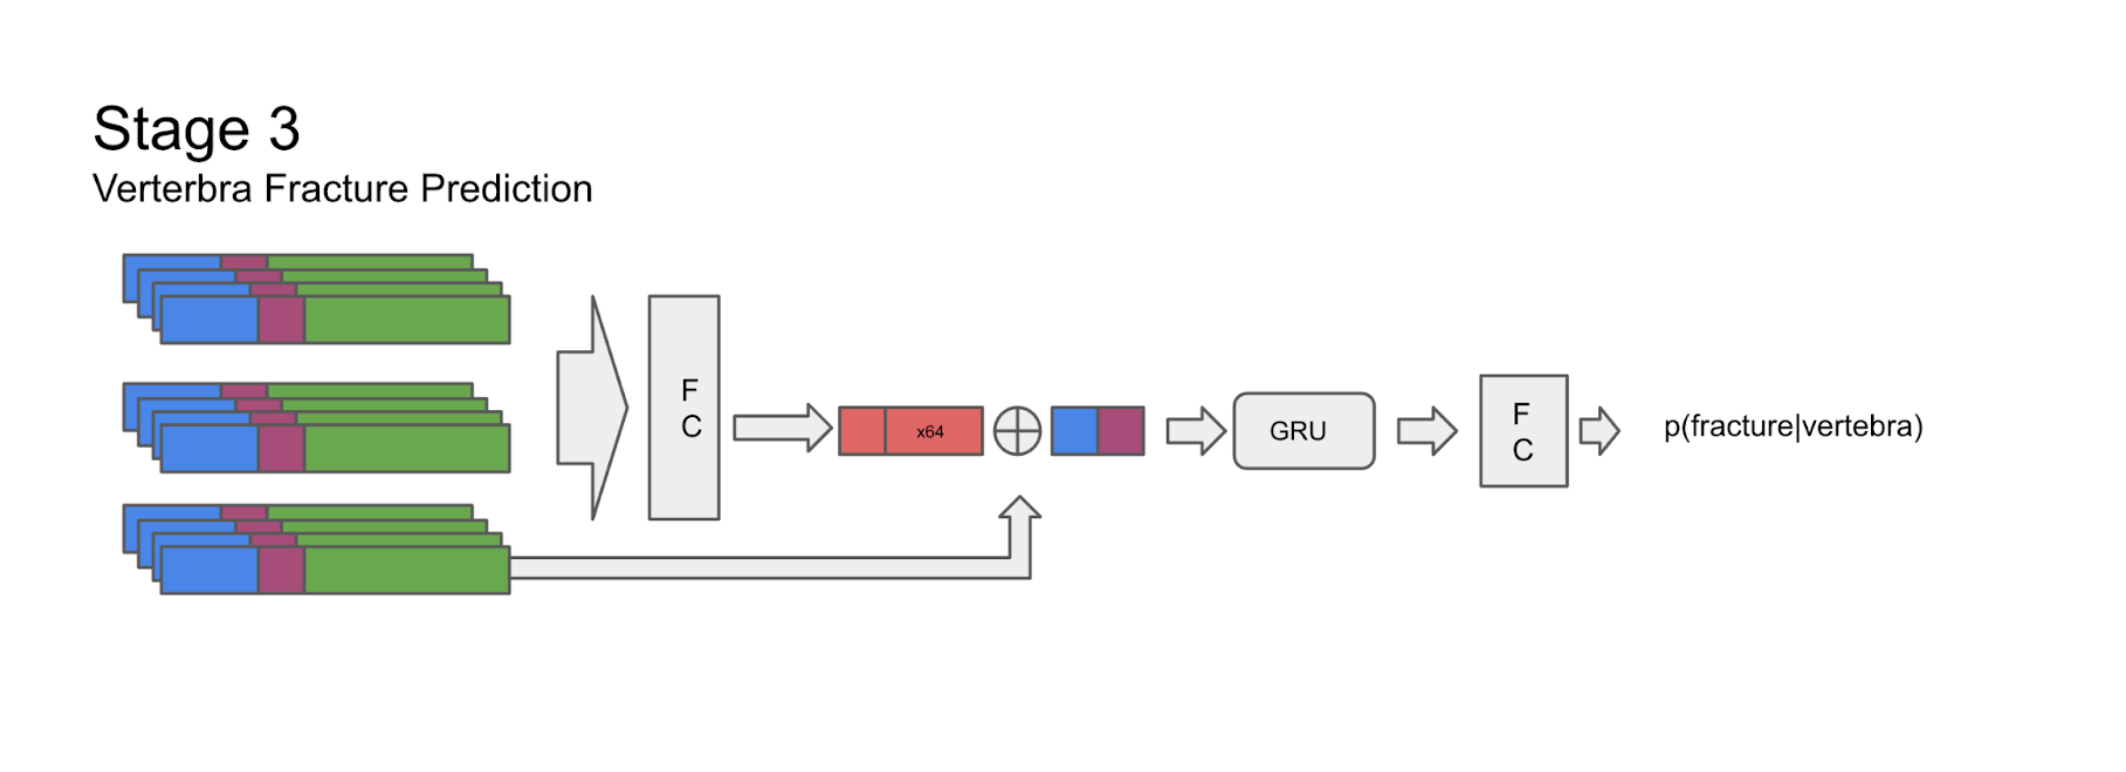
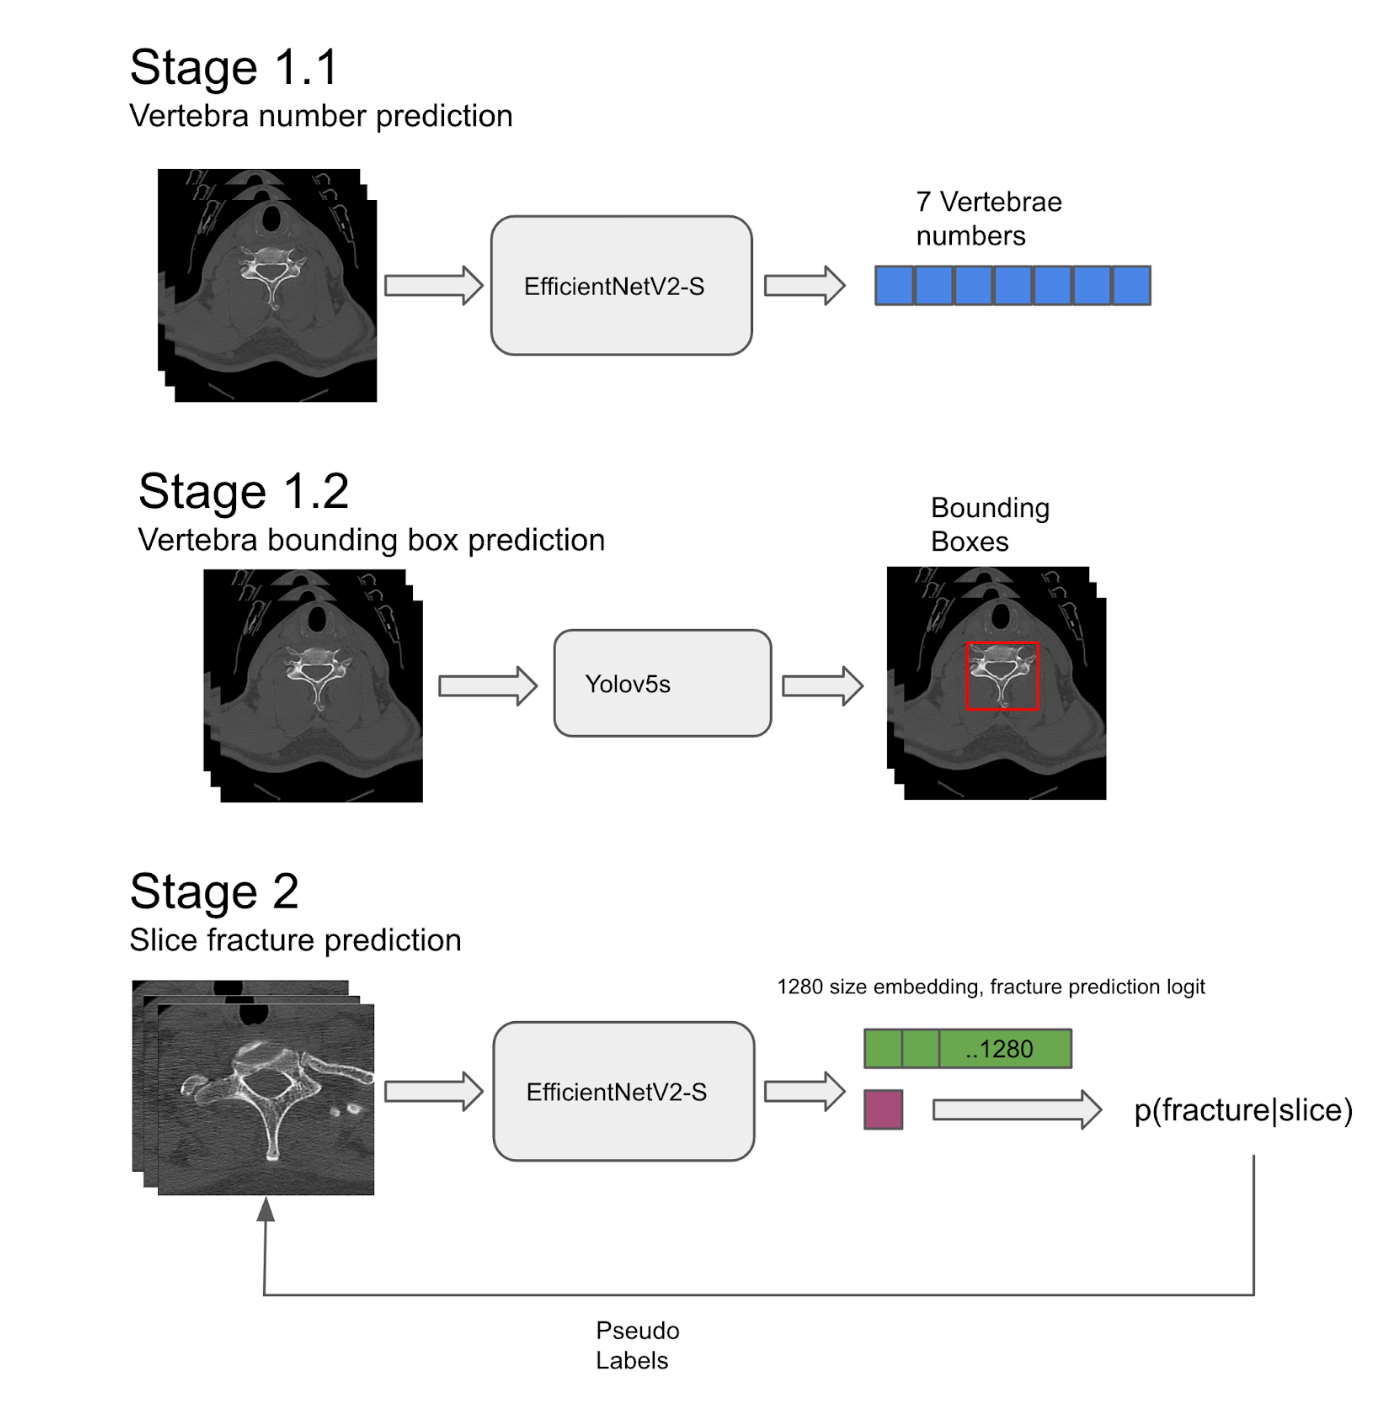
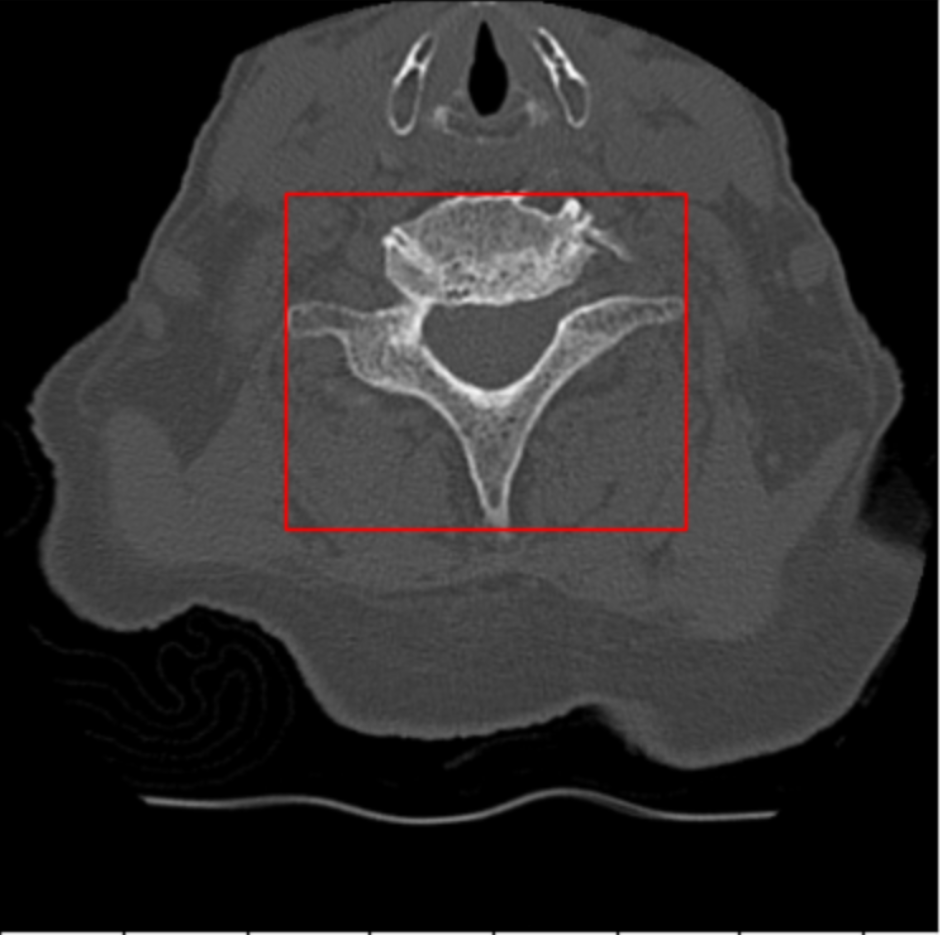
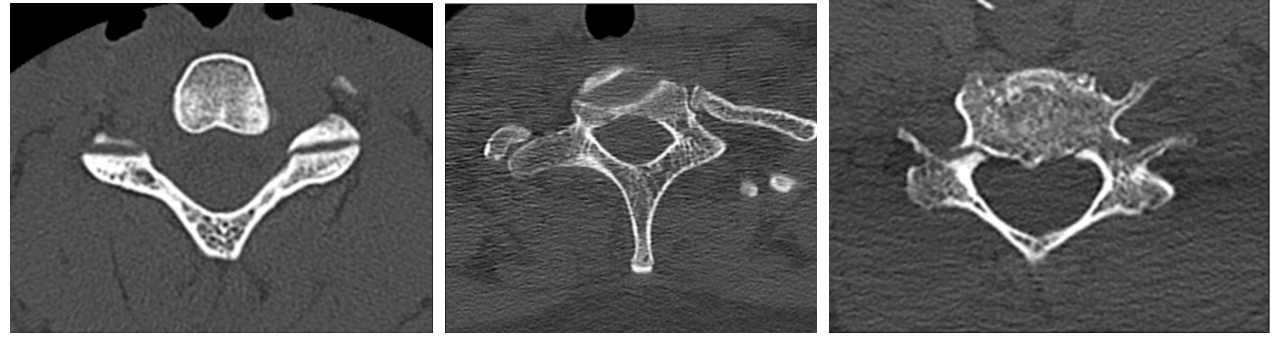
  "content": "<p>Hi Everyone,<br>\nI’d like to thank the organizers for a fun and insightful competition and congratulations to the winners!<br>\nThis is my solution that ended up ranked at 17th place:</p>\n<h3>Overview</h3>\n<p><img src=\"https://www.googleapis.com/download/storage/v1/b/kaggle-forum-message-attachments/o/inbox%2F22991%2Fa8f0c94ca26774330c3bcfada33015b1%2FScreen%20Shot%202022-10-29%20at%208.32.10%20PM.png?generation=1667100758660919&amp;alt=media\" alt=\"\"></p>\n<p><img src=\"https://www.googleapis.com/download/storage/v1/b/kaggle-forum-message-attachments/o/inbox%2F22991%2F16083e42e2d76812e6db31e2212a1535%2FScreen%20Shot%202022-10-29%20at%208.35.36%20PM.png?generation=1667100949403148&amp;alt=media\" alt=\"\"></p>\n<h3>Stage 1.1 - trained a vertebrae number detection model</h3>\n<p>Trained an EfficientNetv2-s for detecting the vertebrae number. I followed the approach outlined by <a href=\"https://www.kaggle.com/vslaykovsky\" target=\"_blank\">@vslaykovsky</a> <a href=\"https://www.kaggle.com/code/vslaykovsky/pytorch-effnetv2-vertebrae-detection-acc-0-95\" target=\"_blank\">here</a> and my model ended up achieving similar 95% accuracy in vertebrae number detection.</p>\n<h3>Stage 1.2- Vertebrae bounding box detection model</h3>\n<p>I trained a Yolov5s model to detect bounding boxes in each dicom slice. The training set of the bounding box was generated based on the annotated pixels in the .nii files. The bounding box can surround multiple vertebrae. </p>\n<p><img src=\"https://www.googleapis.com/download/storage/v1/b/kaggle-forum-message-attachments/o/inbox%2F22991%2F1d43777ca39152f43243f81231322a49%2FScreen%20Shot%202022-10-29%20at%208.39.08%20PM.png?generation=1667101171836481&amp;alt=media\" alt=\"\"></p>\n<h3>Stage 2- slice fracture model</h3>\n<p>I followed the following steps for each slice:</p>\n<ol>\n<li>Apply bone windowing (400,1800)</li>\n<li>Crop the slice based on the bounding box. Add added padding to retain aspect ratio, surrounding tissues and compensate for overly tight bounding box predictions.</li>\n<li>On training time apply augmentations on the cropped images<br>\nThe cropped image size is 384x384 which is the “native” resolution for EfficientNetV2-S models, also enabling starting from pre-trained weights. </li>\n</ol>\n<p>Some cropped examples before augmentation</p>\n<p><img src=\"https://www.googleapis.com/download/storage/v1/b/kaggle-forum-message-attachments/o/inbox%2F22991%2F622d2e799a6bdebb33ec0b8b3e97e973%2FScreen%20Shot%202022-10-29%20at%208.40.38%20PM.png?generation=1667101265349846&amp;alt=media\" alt=\"\"></p>\n<p>For training I used a semi-supervised approach using the following method, which gave me a 0.03 points reduction on both private and public scores:</p>\n<ul>\n<li>Trained a small model first based on the data that had bounding box annotations. For these slices we have a clean set of labels on which slice has a fracture. I used the rest of the slices with no annotations from these studies as negative labels and also added slices from studies that patient_overall is 0. The point was to create the cleanest possible training set.</li>\n<li>I used the model created above to predict fractures on the studies that had fractures but no bounding boxes using the following heuristic, and with the aid of the prediction from the model in stage 1.1:   If (p(fracture)&gt;0.5) and (the vertebra for which the slice belongs to has fractures in train.csv) then generate a positive (fracture) pseudo label for that slice.</li>\n<li>Trained a new model with the original bounding box labels and the new pseudo labels. That’s the final model for stage 2.</li>\n</ul>\n<p>The output of the model is whether there is a fracture or not.</p>\n<h3>Stage 3- vertebra fracture sequence model</h3>\n<p>The approach here was to create a sequence of slice embeddings per vertebra and train a sequence model. I used the following method per vertebrae v_n:</p>\n<ol>\n<li>Using the prediction from the model in stage 1.1, I have the probability of each vertebrae number being present in each slice. Select the first 150 slices where p(v_n) &gt; 0.5</li>\n<li>The model architecture has a fully connected layer before the GRU to reduce dimensionality of the embeddings to 64 before passing it to the GRU. I also added the following features both to the FC layer and with a skip connection to the GRU: all 7 vertebrae number prediction probabilities and the stage 2 slice model final layer logit are concatenated </li>\n<li>The input to the model is the 1280 size embedding taken from the GAP layer in the Stage 2 model + 7 vertebrae number predictions from stage 1.1 model + output logit from stage 2 model, overall 1288 features.</li>\n<li>The output is the probability of whether the given vertebra has a fracture.</li>\n</ol>\n<h3>Combining the predictions to patient_overall</h3>\n<p>Some of my submission had a model that re-calibrates and adds patient_overall prediction based on the per vertebra predictions in stage 3. However what eventually gave me the best results was the simple approach of using the stage 3 model predictions per vertebra as is and calculating patient_overall based  using the following formula: <br>\npatient_overal = 1 - [1-p(frac|V1)]*[1-p(frac|V2)] *..* [1-p(frac|V7)]</p>\n<h3>Inference</h3>\n<p>Overall runtime of the submission is 4 hours. I used a single model for stages 1.1, 1.2 and 2. For stage 3 I used a 5x ensemble</p>\n<p>Due to the large size of the scan data in the competition reading the files is a big bottleneck for the execution runtime. A helpful optimization in the submission notebook was to avoid reading the dicom files repeatedly. One trick I used here was to create a dataloader that loads the image once and returns multiple tensors that were needed for models 1.2 and 2, and calling the two models sequentially in the inference loop with their corresponding input tensors.</p>\n<h3>Hardware</h3>\n<p>In this competition I leveraged AWS. My goto EC2 instance was g5.2xlarge and I was mostly using spot instances. These instances have 32GB of ram, nvidia A10G (24GB RAM) and 8 vcpus</p>\n<p>Thanks-<br>\nOri</p>",
  "messages": [
    {
      "id": 2009469,
      "postDate": "2022-10-30T03:46:25.507Z",
      "content": "<p>Hi Everyone,<br>\nI’d like to thank the organizers for a fun and insightful competition and congratulations to the winners!<br>\nThis is my solution that ended up ranked at 17th place:</p>\n<h3>Overview</h3>\n<p><img src=\"https://www.googleapis.com/download/storage/v1/b/kaggle-forum-message-attachments/o/inbox%2F22991%2Fa8f0c94ca26774330c3bcfada33015b1%2FScreen%20Shot%202022-10-29%20at%208.32.10%20PM.png?generation=1667100758660919&amp;alt=media\" alt=\"\"></p>\n<p><img src=\"https://www.googleapis.com/download/storage/v1/b/kaggle-forum-message-attachments/o/inbox%2F22991%2F16083e42e2d76812e6db31e2212a1535%2FScreen%20Shot%202022-10-29%20at%208.35.36%20PM.png?generation=1667100949403148&amp;alt=media\" alt=\"\"></p>\n<h3>Stage 1.1 - trained a vertebrae number detection model</h3>\n<p>Trained an EfficientNetv2-s for detecting the vertebrae number. I followed the approach outlined by <a href=\"https://www.kaggle.com/vslaykovsky\" target=\"_blank\">@vslaykovsky</a> <a href=\"https://www.kaggle.com/code/vslaykovsky/pytorch-effnetv2-vertebrae-detection-acc-0-95\" target=\"_blank\">here</a> and my model ended up achieving similar 95% accuracy in vertebrae number detection.</p>\n<h3>Stage 1.2- Vertebrae bounding box detection model</h3>\n<p>I trained a Yolov5s model to detect bounding boxes in each dicom slice. The training set of the bounding box was generated based on the annotated pixels in the .nii files. The bounding box can surround multiple vertebrae. </p>\n<p><img src=\"https://www.googleapis.com/download/storage/v1/b/kaggle-forum-message-attachments/o/inbox%2F22991%2F1d43777ca39152f43243f81231322a49%2FScreen%20Shot%202022-10-29%20at%208.39.08%20PM.png?generation=1667101171836481&amp;alt=media\" alt=\"\"></p>\n<h3>Stage 2- slice fracture model</h3>\n<p>I followed the following steps for each slice:</p>\n<ol>\n<li>Apply bone windowing (400,1800)</li>\n<li>Crop the slice based on the bounding box. Add added padding to retain aspect ratio, surrounding tissues and compensate for overly tight bounding box predictions.</li>\n<li>On training time apply augmentations on the cropped images<br>\nThe cropped image size is 384x384 which is the “native” resolution for EfficientNetV2-S models, also enabling starting from pre-trained weights. </li>\n</ol>\n<p>Some cropped examples before augmentation</p>\n<p><img src=\"https://www.googleapis.com/download/storage/v1/b/kaggle-forum-message-attachments/o/inbox%2F22991%2F622d2e799a6bdebb33ec0b8b3e97e973%2FScreen%20Shot%202022-10-29%20at%208.40.38%20PM.png?generation=1667101265349846&amp;alt=media\" alt=\"\"></p>\n<p>For training I used a semi-supervised approach using the following method, which gave me a 0.03 points reduction on both private and public scores:</p>\n<ul>\n<li>Trained a small model first based on the data that had bounding box annotations. For these slices we have a clean set of labels on which slice has a fracture. I used the rest of the slices with no annotations from these studies as negative labels and also added slices from studies that patient_overall is 0. The point was to create the cleanest possible training set.</li>\n<li>I used the model created above to predict fractures on the studies that had fractures but no bounding boxes using the following heuristic, and with the aid of the prediction from the model in stage 1.1:   If (p(fracture)&gt;0.5) and (the vertebra for which the slice belongs to has fractures in train.csv) then generate a positive (fracture) pseudo label for that slice.</li>\n<li>Trained a new model with the original bounding box labels and the new pseudo labels. That’s the final model for stage 2.</li>\n</ul>\n<p>The output of the model is whether there is a fracture or not.</p>\n<h3>Stage 3- vertebra fracture sequence model</h3>\n<p>The approach here was to create a sequence of slice embeddings per vertebra and train a sequence model. I used the following method per vertebrae v_n:</p>\n<ol>\n<li>Using the prediction from the model in stage 1.1, I have the probability of each vertebrae number being present in each slice. Select the first 150 slices where p(v_n) &gt; 0.5</li>\n<li>The model architecture has a fully connected layer before the GRU to reduce dimensionality of the embeddings to 64 before passing it to the GRU. I also added the following features both to the FC layer and with a skip connection to the GRU: all 7 vertebrae number prediction probabilities and the stage 2 slice model final layer logit are concatenated </li>\n<li>The input to the model is the 1280 size embedding taken from the GAP layer in the Stage 2 model + 7 vertebrae number predictions from stage 1.1 model + output logit from stage 2 model, overall 1288 features.</li>\n<li>The output is the probability of whether the given vertebra has a fracture.</li>\n</ol>\n<h3>Combining the predictions to patient_overall</h3>\n<p>Some of my submission had a model that re-calibrates and adds patient_overall prediction based on the per vertebra predictions in stage 3. However what eventually gave me the best results was the simple approach of using the stage 3 model predictions per vertebra as is and calculating patient_overall based  using the following formula: <br>\npatient_overal = 1 - [1-p(frac|V1)]*[1-p(frac|V2)] *..* [1-p(frac|V7)]</p>\n<h3>Inference</h3>\n<p>Overall runtime of the submission is 4 hours. I used a single model for stages 1.1, 1.2 and 2. For stage 3 I used a 5x ensemble</p>\n<p>Due to the large size of the scan data in the competition reading the files is a big bottleneck for the execution runtime. A helpful optimization in the submission notebook was to avoid reading the dicom files repeatedly. One trick I used here was to create a dataloader that loads the image once and returns multiple tensors that were needed for models 1.2 and 2, and calling the two models sequentially in the inference loop with their corresponding input tensors.</p>\n<h3>Hardware</h3>\n<p>In this competition I leveraged AWS. My goto EC2 instance was g5.2xlarge and I was mostly using spot instances. These instances have 32GB of ram, nvidia A10G (24GB RAM) and 8 vcpus</p>\n<p>Thanks-<br>\nOri</p>",
      "rawMarkdown": "Hi Everyone,\nI’d like to thank the organizers for a fun and insightful competition and congratulations to the winners!\nThis is my solution that ended up ranked at 17th place:\n\n### Overview\n\n![](https://www.googleapis.com/download/storage/v1/b/kaggle-forum-message-attachments/o/inbox%2F22991%2Fa8f0c94ca26774330c3bcfada33015b1%2FScreen%20Shot%202022-10-29%20at%208.32.10%20PM.png?generation=1667100758660919&alt=media)\n\n![](https://www.googleapis.com/download/storage/v1/b/kaggle-forum-message-attachments/o/inbox%2F22991%2F16083e42e2d76812e6db31e2212a1535%2FScreen%20Shot%202022-10-29%20at%208.35.36%20PM.png?generation=1667100949403148&alt=media)\n\n\n### Stage 1.1 - trained a vertebrae number detection model\nTrained an EfficientNetv2-s for detecting the vertebrae number. I followed the approach outlined by @vslaykovsky [here](https://www.kaggle.com/code/vslaykovsky/pytorch-effnetv2-vertebrae-detection-acc-0-95) and my model ended up achieving similar 95% accuracy in vertebrae number detection.\n\n\n\n\n### Stage 1.2- Vertebrae bounding box detection model\nI trained a Yolov5s model to detect bounding boxes in each dicom slice. The training set of the bounding box was generated based on the annotated pixels in the .nii files. The bounding box can surround multiple vertebrae. \n\n![](https://www.googleapis.com/download/storage/v1/b/kaggle-forum-message-attachments/o/inbox%2F22991%2F1d43777ca39152f43243f81231322a49%2FScreen%20Shot%202022-10-29%20at%208.39.08%20PM.png?generation=1667101171836481&alt=media)\n\n\n### Stage 2- slice fracture model\nI followed the following steps for each slice:\n1. Apply bone windowing (400,1800)\n2. Crop the slice based on the bounding box. Add added padding to retain aspect ratio, surrounding tissues and compensate for overly tight bounding box predictions.\n3. On training time apply augmentations on the cropped images\nThe cropped image size is 384x384 which is the “native” resolution for EfficientNetV2-S models, also enabling starting from pre-trained weights. \n\n\n\n\nSome cropped examples before augmentation\n\n![](https://www.googleapis.com/download/storage/v1/b/kaggle-forum-message-attachments/o/inbox%2F22991%2F622d2e799a6bdebb33ec0b8b3e97e973%2FScreen%20Shot%202022-10-29%20at%208.40.38%20PM.png?generation=1667101265349846&alt=media)\n\n\nFor training I used a semi-supervised approach using the following method, which gave me a 0.03 points reduction on both private and public scores:\n- Trained a small model first based on the data that had bounding box annotations. For these slices we have a clean set of labels on which slice has a fracture. I used the rest of the slices with no annotations from these studies as negative labels and also added slices from studies that patient_overall is 0. The point was to create the cleanest possible training set.\n- I used the model created above to predict fractures on the studies that had fractures but no bounding boxes using the following heuristic, and with the aid of the prediction from the model in stage 1.1:   If (p(fracture)>0.5) and (the vertebra for which the slice belongs to has fractures in train.csv) then generate a positive (fracture) pseudo label for that slice.\n- Trained a new model with the original bounding box labels and the new pseudo labels. That’s the final model for stage 2.\n\n\n\nThe output of the model is whether there is a fracture or not.\n\n\n### Stage 3- vertebra fracture sequence model\nThe approach here was to create a sequence of slice embeddings per vertebra and train a sequence model. I used the following method per vertebrae v_n:\n1. Using the prediction from the model in stage 1.1, I have the probability of each vertebrae number being present in each slice. Select the first 150 slices where p(v_n) > 0.5\n2. The model architecture has a fully connected layer before the GRU to reduce dimensionality of the embeddings to 64 before passing it to the GRU. I also added the following features both to the FC layer and with a skip connection to the GRU: all 7 vertebrae number prediction probabilities and the stage 2 slice model final layer logit are concatenated \n3. The input to the model is the 1280 size embedding taken from the GAP layer in the Stage 2 model + 7 vertebrae number predictions from stage 1.1 model + output logit from stage 2 model, overall 1288 features.\n4. The output is the probability of whether the given vertebra has a fracture.\n\n\n### Combining the predictions to patient_overall\nSome of my submission had a model that re-calibrates and adds patient_overall prediction based on the per vertebra predictions in stage 3. However what eventually gave me the best results was the simple approach of using the stage 3 model predictions per vertebra as is and calculating patient_overall based  using the following formula: \npatient_overal = 1 - [1-p(frac|V1)]*[1-p(frac|V2)] *..* [1-p(frac|V7)]\n\n\n\n\n### Inference\nOverall runtime of the submission is 4 hours. I used a single model for stages 1.1, 1.2 and 2. For stage 3 I used a 5x ensemble\n\nDue to the large size of the scan data in the competition reading the files is a big bottleneck for the execution runtime. A helpful optimization in the submission notebook was to avoid reading the dicom files repeatedly. One trick I used here was to create a dataloader that loads the image once and returns multiple tensors that were needed for models 1.2 and 2, and calling the two models sequentially in the inference loop with their corresponding input tensors.\n\n\n### Hardware\nIn this competition I leveraged AWS. My goto EC2 instance was g5.2xlarge and I was mostly using spot instances. These instances have 32GB of ram, nvidia A10G (24GB RAM) and 8 vcpus\n\n\nThanks-\nOri\n",
      "votes": 33
    },
    {
      "id": 2010849,
      "postDate": "2022-10-31T07:18:02.997Z",
      "content": "<p>Congratulations, <a href=\"https://www.kaggle.com/ohanegby\" target=\"_blank\">@ohanegby</a>! This is a solid architecture!</p>",
      "rawMarkdown": "Congratulations, @ohanegby! This is a solid architecture!",
      "votes": 1
    },
    {
      "id": 2010773,
      "postDate": "2022-10-31T05:49:25.993Z",
      "content": "<p>Congratulation and thanks for sharing your solution <a href=\"https://www.kaggle.com/ohanegby\" target=\"_blank\">@ohanegby</a> </p>",
      "rawMarkdown": "Congratulation and thanks for sharing your solution @ohanegby ",
      "votes": 1
    },
    {
      "id": 2009953,
      "postDate": "2022-10-30T12:22:16.763Z",
      "content": "<p>Great result <a href=\"https://www.kaggle.com/ohanegby\" target=\"_blank\">@ohanegby</a>! Congratulations and best regards! Thanks for the detailed approach note too. </p>",
      "rawMarkdown": "Great result @ohanegby! Congratulations and best regards! Thanks for the detailed approach note too. ",
      "votes": 1
    }
  ],
  "comments": [
    {
      "id": 2010849,
      "author_name": "Vladimir Slaykovskiy",
      "author_url": "",
      "post_date": "2022-10-31T07:18:02.997000",
      "content": "<p>Congratulations, <a href=\"https://www.kaggle.com/ohanegby\" target=\"_blank\">@ohanegby</a>! This is a solid architecture!</p>",
      "votes": 1,
      "replies": []
    },
    {
      "id": 2010773,
      "author_name": "SandhyaKrishnan02",
      "author_url": "",
      "post_date": "2022-10-31T05:49:25.993000",
      "content": "<p>Congratulation and thanks for sharing your solution <a href=\"https://www.kaggle.com/ohanegby\" target=\"_blank\">@ohanegby</a> </p>",
      "votes": 1,
      "replies": []
    },
    {
      "id": 2009953,
      "author_name": "Ravi Ramakrishnan",
      "author_url": "",
      "post_date": "2022-10-30T12:22:16.763000",
      "content": "<p>Great result <a href=\"https://www.kaggle.com/ohanegby\" target=\"_blank\">@ohanegby</a>! Congratulations and best regards! Thanks for the detailed approach note too. </p>",
      "votes": 1,
      "replies": []
    }
  ],
  "raw_markdown_by_id": {
    "2009469": "Hi Everyone,\nI’d like to thank the organizers for a fun and insightful competition and congratulations to the winners!\nThis is my solution that ended up ranked at 17th place:\n\n### Overview\n\n![](https://www.googleapis.com/download/storage/v1/b/kaggle-forum-message-attachments/o/inbox%2F22991%2Fa8f0c94ca26774330c3bcfada33015b1%2FScreen%20Shot%202022-10-29%20at%208.32.10%20PM.png?generation=1667100758660919&alt=media)\n\n![](https://www.googleapis.com/download/storage/v1/b/kaggle-forum-message-attachments/o/inbox%2F22991%2F16083e42e2d76812e6db31e2212a1535%2FScreen%20Shot%202022-10-29%20at%208.35.36%20PM.png?generation=1667100949403148&alt=media)\n\n\n### Stage 1.1 - trained a vertebrae number detection model\nTrained an EfficientNetv2-s for detecting the vertebrae number. I followed the approach outlined by @vslaykovsky [here](https://www.kaggle.com/code/vslaykovsky/pytorch-effnetv2-vertebrae-detection-acc-0-95) and my model ended up achieving similar 95% accuracy in vertebrae number detection.\n\n\n\n\n### Stage 1.2- Vertebrae bounding box detection model\nI trained a Yolov5s model to detect bounding boxes in each dicom slice. The training set of the bounding box was generated based on the annotated pixels in the .nii files. The bounding box can surround multiple vertebrae. \n\n![](https://www.googleapis.com/download/storage/v1/b/kaggle-forum-message-attachments/o/inbox%2F22991%2F1d43777ca39152f43243f81231322a49%2FScreen%20Shot%202022-10-29%20at%208.39.08%20PM.png?generation=1667101171836481&alt=media)\n\n\n### Stage 2- slice fracture model\nI followed the following steps for each slice:\n1. Apply bone windowing (400,1800)\n2. Crop the slice based on the bounding box. Add added padding to retain aspect ratio, surrounding tissues and compensate for overly tight bounding box predictions.\n3. On training time apply augmentations on the cropped images\nThe cropped image size is 384x384 which is the “native” resolution for EfficientNetV2-S models, also enabling starting from pre-trained weights. \n\n\n\n\nSome cropped examples before augmentation\n\n![](https://www.googleapis.com/download/storage/v1/b/kaggle-forum-message-attachments/o/inbox%2F22991%2F622d2e799a6bdebb33ec0b8b3e97e973%2FScreen%20Shot%202022-10-29%20at%208.40.38%20PM.png?generation=1667101265349846&alt=media)\n\n\nFor training I used a semi-supervised approach using the following method, which gave me a 0.03 points reduction on both private and public scores:\n- Trained a small model first based on the data that had bounding box annotations. For these slices we have a clean set of labels on which slice has a fracture. I used the rest of the slices with no annotations from these studies as negative labels and also added slices from studies that patient_overall is 0. The point was to create the cleanest possible training set.\n- I used the model created above to predict fractures on the studies that had fractures but no bounding boxes using the following heuristic, and with the aid of the prediction from the model in stage 1.1:   If (p(fracture)>0.5) and (the vertebra for which the slice belongs to has fractures in train.csv) then generate a positive (fracture) pseudo label for that slice.\n- Trained a new model with the original bounding box labels and the new pseudo labels. That’s the final model for stage 2.\n\n\n\nThe output of the model is whether there is a fracture or not.\n\n\n### Stage 3- vertebra fracture sequence model\nThe approach here was to create a sequence of slice embeddings per vertebra and train a sequence model. I used the following method per vertebrae v_n:\n1. Using the prediction from the model in stage 1.1, I have the probability of each vertebrae number being present in each slice. Select the first 150 slices where p(v_n) > 0.5\n2. The model architecture has a fully connected layer before the GRU to reduce dimensionality of the embeddings to 64 before passing it to the GRU. I also added the following features both to the FC layer and with a skip connection to the GRU: all 7 vertebrae number prediction probabilities and the stage 2 slice model final layer logit are concatenated \n3. The input to the model is the 1280 size embedding taken from the GAP layer in the Stage 2 model + 7 vertebrae number predictions from stage 1.1 model + output logit from stage 2 model, overall 1288 features.\n4. The output is the probability of whether the given vertebra has a fracture.\n\n\n### Combining the predictions to patient_overall\nSome of my submission had a model that re-calibrates and adds patient_overall prediction based on the per vertebra predictions in stage 3. However what eventually gave me the best results was the simple approach of using the stage 3 model predictions per vertebra as is and calculating patient_overall based  using the following formula: \npatient_overal = 1 - [1-p(frac|V1)]*[1-p(frac|V2)] *..* [1-p(frac|V7)]\n\n\n\n\n### Inference\nOverall runtime of the submission is 4 hours. I used a single model for stages 1.1, 1.2 and 2. For stage 3 I used a 5x ensemble\n\nDue to the large size of the scan data in the competition reading the files is a big bottleneck for the execution runtime. A helpful optimization in the submission notebook was to avoid reading the dicom files repeatedly. One trick I used here was to create a dataloader that loads the image once and returns multiple tensors that were needed for models 1.2 and 2, and calling the two models sequentially in the inference loop with their corresponding input tensors.\n\n\n### Hardware\nIn this competition I leveraged AWS. My goto EC2 instance was g5.2xlarge and I was mostly using spot instances. These instances have 32GB of ram, nvidia A10G (24GB RAM) and 8 vcpus\n\n\nThanks-\nOri\n",
    "2010849": "Congratulations, @ohanegby! This is a solid architecture!",
    "2010773": "Congratulation and thanks for sharing your solution @ohanegby ",
    "2009953": "Great result @ohanegby! Congratulations and best regards! Thanks for the detailed approach note too. "
  }
}